Charlotte handyman projects that you can do. Call 1 Home Services 704-614-3420
A textured ceiling that’s deteriorated or suffered water damage can be restored to new condition by scraping, priming, and then spraying new texture. It’s simpler than it looks. If you are the handyman around the house follow the steps here.
Scrape and prep the ceiling, then texture
 Call 1 Home Services, Charlotte handyman 704-614-3420. For all your
Charlotte handyman projects
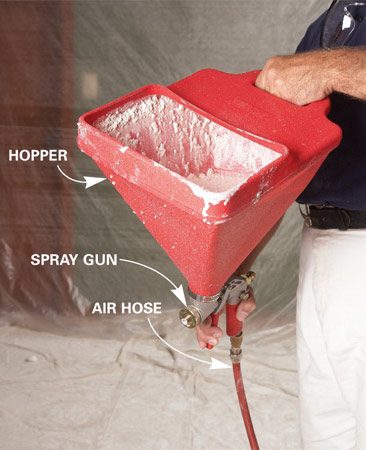
Hopper gun
Buy a hopper gun like this and connect it to any 2.5-cfm or larger air compressor. If you are a handyman this should be something you can handle.
If your spray-textured ceiling is just dingy or stained, you can renew it with a coat each of sealer and paint. But if the texture is falling off or missing in spots, you’ll have to reapply texture to fix the problem. For small areas, say less than a foot in diameter, you could try using an aerosol can of repair texture. But the patch is bound to stick out like a sore thumb. For the best results, you’re better off respraying the entire ceiling. It’s a messy job, but it’s not hard to do. In fact, after you spray one room, you’ll probably want to keep going. You can spray-texture unsightly plaster or smooth drywall ceilings too. As with most jobs, the key is in the prep work, which is the time-consuming part too. Once the room is masked off, the ceiling prepped and the texture mixed, it’ll only take you about 15 minutes to spray the ceiling.
If any of the paper drywall tape is loose or the drywall is soft or damaged, you’ll have to repair and sand these areas first. In addition to the putty knives and drywall joint compound for the repairs, you’ll need a wide putty or taping knife for scraping, a roll of 1-1/2-in. or wider masking tape, enough painter’s plastic to cover the walls, a gallon or two of primer/sealer, a bag of spray texture (enough to cover 300 to 400 sq. ft.), and a compressor and hopper gun. You can buy coarse, medium or fine texture. If you’re matching existing ceilings, take a sample of the material with you when you buy the texture and ask for help matching it. Medium is usually the best choice and will match most ceilings. You can rent a compressor and hopper gun for a half day or buy a hopper gun and connect it to any average-size or larger compressor. If you use a small compressor, you may occasionally have to stop spraying to let the pressure build up. Minimize rental costs by getting all the prep work done before you pick up the compressor and hopper gun. Handyman in Charlotte can be found if you need someone to help.
Start by removing everything you can from the room. If you must leave large furniture in the room, stack it in the center and cover it with plastic. Cover the floor with sheets or a canvas drop cloth. Then cover the walls with thin (1-mil or less) poly sheeting (Photo 1). Painter’s plastic is very thin and works great. Leave an opening with overlapping poly at the doorway so you can get in and out. Turn off the power to the lights and remove any ceiling fixtures. Don’t forget to cap the bare wires with wire connectors. Stuff newspaper into the electrical box to keep out the spray texture.
The next step is to scrape off the old texture (Photo 2), but not before you’ve had it tested for asbestos. If it hasn’t been painted, it’ll usually come off easily. So try just scraping it first. If that doesn’t work (you’ll know right away), try wetting the texture with a pump-up garden sprayer. That might make it easier to scrape, but it’ll leave a sticky mess on the floor. If you use this method, cover your drop cloths with 4-mil plastic so you can wad it up and dispose of the wet texture and not track it all over the house. Texture that’s been painted over can be a lot harder to remove. Just do the best you can. Try to knock off the high spots and flatten it as much as possible. The ceiling doesn’t have to be smooth, but it’s easier to get a nice-looking job if most of the old texture has been removed.
When you’re done scraping, paint the ceiling with stain-sealing primer (Photo 3). BIN and KILZ are two popular brands. Use an aerosol can of solvent-based sealer such as BIN white shellac to spot-prime severe stains. Then paint the entire ceiling with a water-based primer/sealer.
The key to a successful spray-texture job is mixing the texture to the right consistency. Don’t mix it too thick. Use the amount of water recommended on the bag as a starting point. Then adjust the thickness by adding more water or powder. Mix slowly using a mixing paddle mounted in a 1/2-in. drill (Photo 4). Mix thoroughly, adding water until the material reaches the consistency of runny yogurt—or thick paint—with tiny lumps in it. Let the texture sit for 15 minutes, then remix, adding more water if necessary.
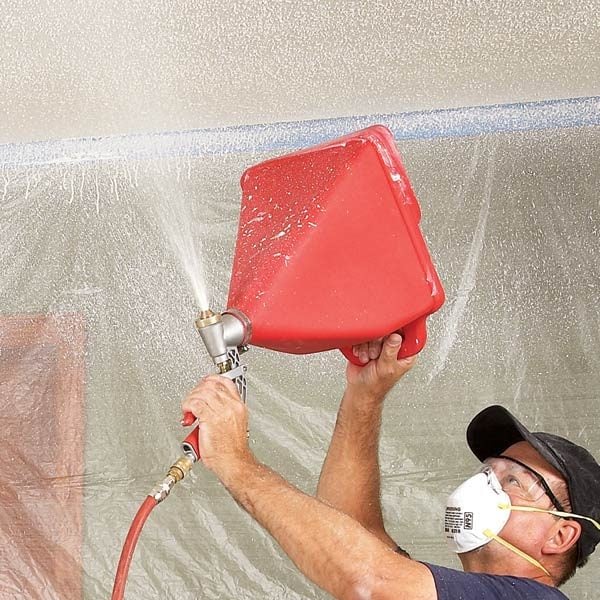
There are a few different versions of hopper guns, but they all have a mechanism at the nose that controls the diameter of the pattern, and a trigger control that helps govern the volume of spray. Start by setting both controls to the middle position. Then load the hopper about half full with texture material and practice on a piece of cardboard or drywall scrap (Photo 5). Adjust the spray pattern and trigger until you can get a nice, even pattern without runs or excess buildup. When you’re comfortable with the spraying technique, start on the ceiling.
Start by spraying the perimeter (Photo 6). Hold the gun about 18 to 24 in. from the ceiling and aim so that about two-thirds of the spray hits the ceiling and the rest hits the wall. Move quickly around the room, paying special attention to the inside corners where walls meet. Remember, you can make another pass if it’s too light. The goal is to cover the ceiling with an even layer of texture. Don’t worry if it looks too smooth. The texture will become more pronounced as it dries. Be careful to avoid puddles. If you mess up and get a puddle or just a thick buildup, stop and scrape off all the texture with a wide putty knife. Then try again. Move the gun back and forth while backing up across the room. After you’ve covered the ceiling, turn 90 degrees and apply another light coat at a right angle to the first. Concentrate on filling in light spots to create an even texture.
When you’re satisfied with the consistency of the texture, you can clean up the gun, hopper and hose with water and pull down the poly. If your masking job was a little off and there’s texture on the wall or flooring, wait for it to dry. Then carefully scrape it off and remove the white residue with a wet sponge.
Call 1 Home Services can Help with any of your Handyman needs. 704-614-3420
CAUTION! We are the Local Handyman that can Help with your projects.
If you have ceiling texture applied before 1980, it may contain asbestos. Before you remove any ceiling texture, contact your state’s department of environmental protection, department of health or a regional asbestos coordinator for information on asbestos testing and removal. For a list of contacts, go towww.epa.gov/asbestos/pubs/ regioncontact2.html#reg5 For general information on asbestos, go toepa.gov/aspestos.