Electricians in Charlotte N C
Electricians in Charlotte N C
Electrical boxes must be flush with the wall surface, which can present problems when you add wainscoting or paneling. The easiest fix is usually a metal or plastic extension ring.
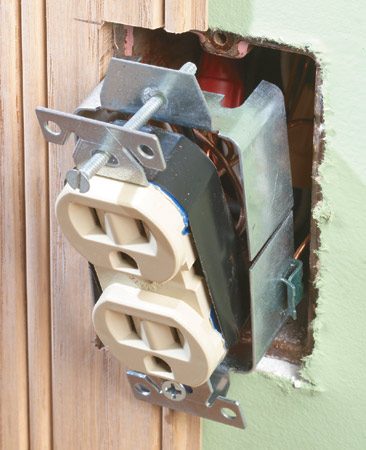
Extension ring
Wrap electrical tape around the outlet to guard against accidental short circuits. Fit the extension ring around the outlet, then screw it in.
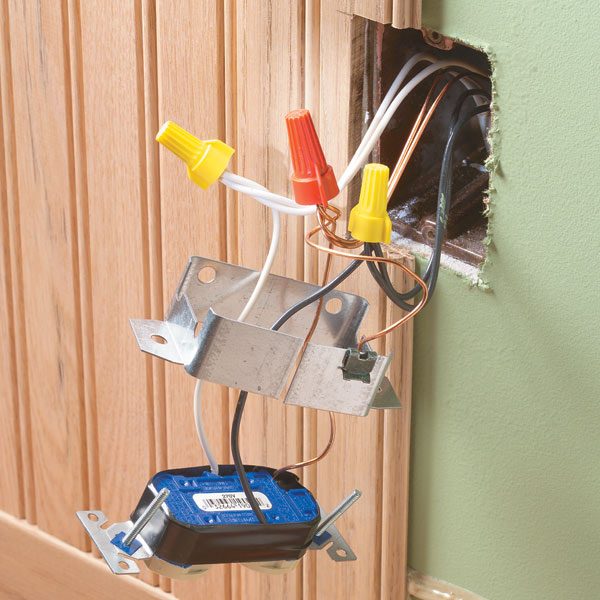
Adding wood wainscoting or paneling? Remember that electrical boxes need to be flush with the wall. You can move the boxes out, but you’d have to cut the wall open. It’s easier to use a plastic or steel extension ring. They’re available up to 1-1/4 in. deep.
To install an extension ring, first turn off the power to the receptacle at the main panel, then remove the cover plate and unscrew the receptacle from the box. Pull the receptacle away from the box (don’t disconnect the wires). If you’re using a steel ring, press a grounding clip onto it and connect a 6-in. grounding wire. Connect the other end to the ground pigtail. Fasten the receptacle back to the box using the longer screws that come with the extension ring.
CAUTION!
Turn off power to the outlet at the breaker box before opening the outlet, then test the wires with a voltage tester.

Outlet shims
Outlet shims solve the problem created when electrical boxes are recessed too deeply; use them as needed for new installations and for repairs to old, wobbly outlets.
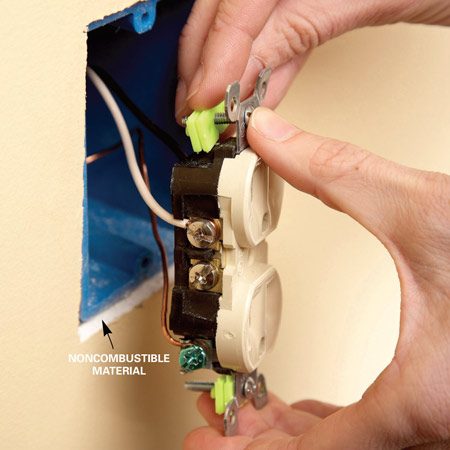
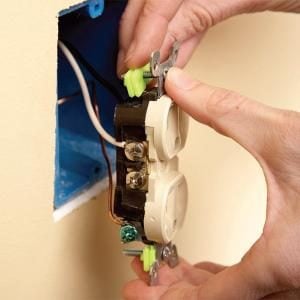
Photo 1: Remove the screws
Turn off the power and check with a voltage tester to make sure there’s no power to the outlet. Unscrew the outlet and add enough shims to bring the outlet flush to the wall.
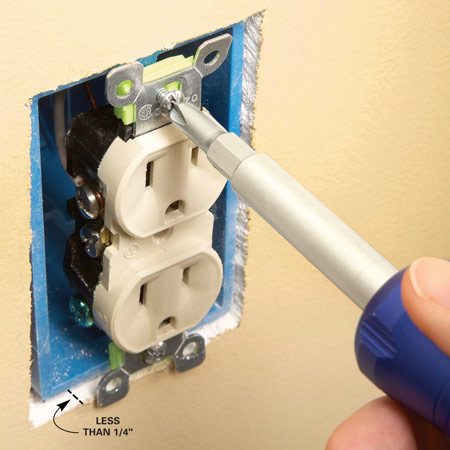
Photo 2: Shim and retighten
Screw the outlet to the box and reinstall the cover plate. Turn the power back on.
The constant movement of loose electrical outlets can loosen the wires connected to the outlet and create dangerous arcing. Luckily, the fix is simple. If the outlet is recessed less than 1/4 in. in noncombustible material, you can fur it out with outlet shims as shown. If it’s recessed more than 1/4 in., use a plastic extension ring. You’ll find both in the electrical department at home centers.
CAUTION!
Turn power off before doing this repair.
All GFCI outlets have one little-known flaw: their circuitry eventually wears out, usually after about 10 years, at which point they no longer function properly. Here’s the whole story.
By the DIY experts of The Family Handyman Magazine:February 2007
- Testing your GFCI
-
Testing your GFCI
 1 of 1
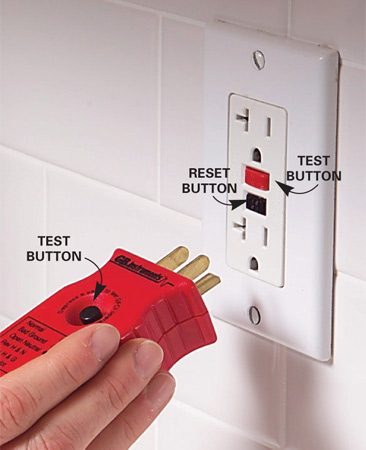
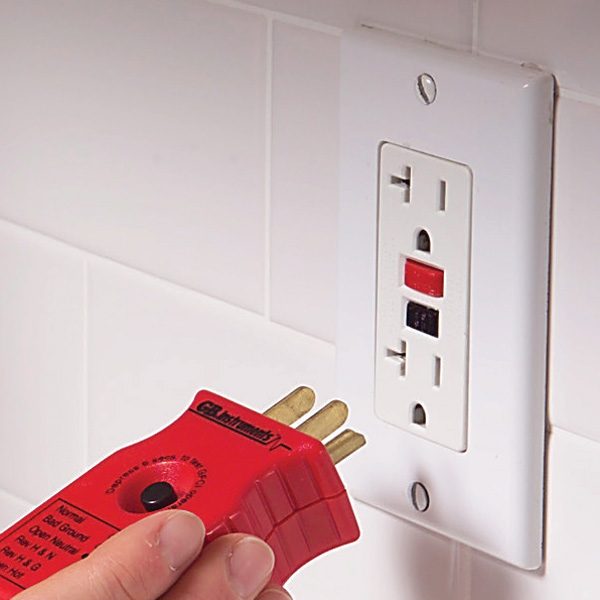
GFCI tester
The reset button alone won’t tell you if a pre-2006 GFCI outlet is still working properly-you’ll need to check it with a special tester.
By detecting dangerous current flow and instantly shutting off power, ground fault circuit interrupters save hundreds of lives each year. But after 10 years or so, the sensitive circuitry inside a GFCI wears out. And usually the test button on the GFCI doesn’t tell you there’s anything wrong: When you press the button, it shuts off the power as always. So the only reliable way to check an older GFCI is to use a circuit tester that has its own GFCI test button (sold at home centers and hardware stores).
Plug in the tester and push its test button. If the power goes off, the GFCI is working. Press the reset button to restore power. If the power doesn’t go off, replace the GFCI.
Your new GFCI will never require a circuit tester. All GFCIs manufactured after mid-2006 are designed to tell you when they fail. The vast majority indicate failure by shutting off power permanently. So someday your GFCI (and any other outlets connected to it) will simply stop delivering power and you’ll have to replace it.
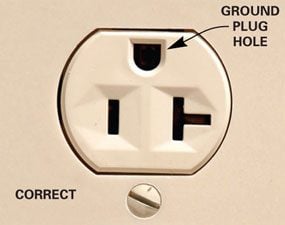
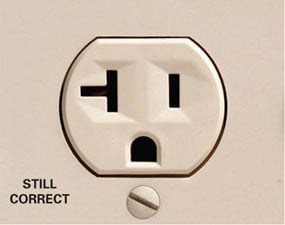
Install outlets (receptacles) with the ground hole either up or down. Both are correct. But be consistent.
By the DIY experts of The Family Handyman Magazine:December / January 2008
- Ground hole up or down?
-
Ground hole up or down?
 1 of 2
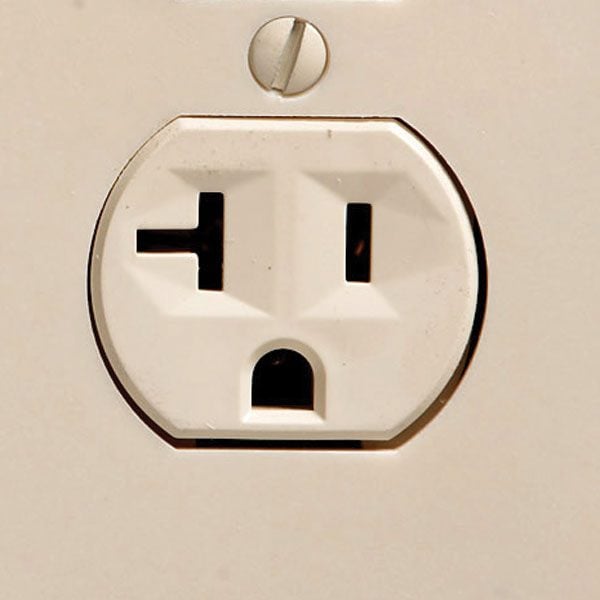
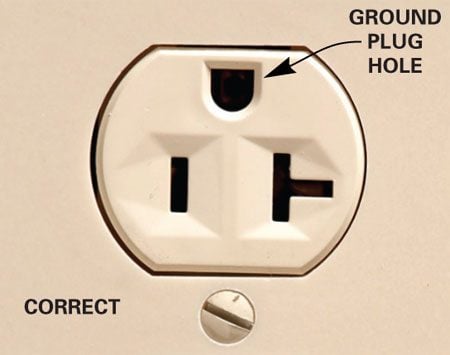
Photo 1: Ground hole up
The electrical code allows outlets to be installed with the ground plug hole facing up, down or sideways. It’s up to you.
 2 of 2
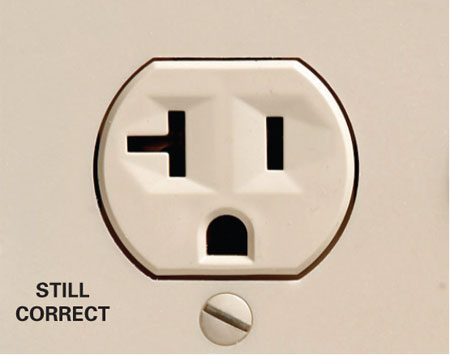
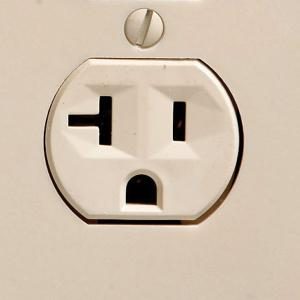
Photo 2: Ground hole down
The ground hole is in the down.
You usually see outlets installed with the ground hole down (Photo 2). But it’s no better than installing them the opposite direction (Photo 1). Electricians endlessly debate this and vigorously exalt the virtues of installing it one way or the other, but we’ll tell it to you straight-it just doesn’t matter. Both ways are correct. The electric code doesn’t specify which direction the ground plug hole needs to face. One way isn’t safer than the other-as long as the outlet is wired correctly.
It all comes down to aesthetics, so install them whatever way looks best to you. Incidentally, the ground plug is typically down in the United States, the opposite of how it’s generally installed in Canada.
KNOW YOUR HOME’S ELECTRICAL SYSTEM
If you’re building or remodeling, our experts share advice for planning your home’s electrical system.
More in Electrical

The electrical system consists of the electrical service (the actual electricity supplied to your home), lighting outlets and various hardwired appliances. The electrical service must be sized to accommodate the lifestyle of the occupants, and is usually between 100 amps and 200 amps, though 400 amps for a very large home is common. An electrician installs the service, and may also install telephone and cable TV wires and, less frequently, security systems.
The electrical lines are run from the street to the meter box outside the home (the unit where your electricity is read to determine your electric utility bill, which can be altered if you check out some Frontier Utilities reviews to see what would be best), then through an exterior wall and directly into the electric panel board, which has switches (also known as breakers) to control the electricity in each room of your home. Here, the amps are divided up across circuits to provide various areas of the home with electricity. For example, of the 200 amps available in a home, the circuit for the living room may have 20 amps, the circuit for the bedroom may have 10 amps, and so on.
An electrical system is required by building code to protect you and your family. Some of the safety measures include:
- Circuit breakers prevent fires by cutting off the electricity supply to a certain area if the wires short out.
- Ground fault circuit interrupters (GFCI) in high-moisture areas such as kitchens, bathrooms, garages and pool areas protect occupants from electric shock by cutting off power to the circuit.
- Smoke alarms in each bedroom and in common spaces on each floor, like hallways, are hardwired to the electrical system and interconnected to each other to alert occupants of a fire. Most have battery backup as well.
Electrical systems also are regulated by an international and local building code. For example, electrical codes in some regions require wiring to be in flexible metal casing as an additional fire prevention measure. An electrical inspector must check the installation when the system is first being wired and again when the home is finished — right before closing — to ensure all codes are followed and the electrical system is safe for you and your family.
If you have specific needs, like a large audio/visual entertainment complex or a home office, which may be built as separate custom structures you may need to ask your builder whether they offer advanced wiring systems, and what these systems include.
KNOW YOUR HOME’S ELECTRICAL SYSTEM
If you’re building or remodeling, our experts share advice for planning your home’s electrical system.
More in Electrical
ALL ABOUT…The electrical system consists of the electrical service (the actual electricity supplied to your home), lighting outlets and various hardwired appliances. The electrical service must be sized to accommodate the lifestyle of the occupants, and is usually between 100 amps and 200 amps, though 400 amps for a very large home is common. An electrician installs the service, and may also install telephone and cable TV wires and, less frequently, security systems.
The electrical lines are run from the street to the meter box outside the home (the unit where your electricity is read to determine your electric utility bill), then through an exterior wall and directly into the electric panel board, which has switches (also known as breakers) to control the electricity in each room of your home. Here, the amps are divided up across circuits to provide various areas of the home with electricity. For example, of the 200 amps available in a home, the circuit for the living room may have 20 amps, the circuit for the bedroom may have 10 amps, and so on.
An electrical system is required by building code to protect you and your family. Some of the safety measures include:
- Circuit breakers prevent fires by cutting off the electricity supply to a certain area if the wires short out.
- Ground fault circuit interrupters (GFCI) in high-moisture areas such as kitchens, bathrooms, garages and pool areas protect occupants from electric shock by cutting off power to the circuit.
- Smoke alarms in each bedroom and in common spaces on each floor, like hallways, are hardwired to the electrical system and interconnected to each other to alert occupants of a fire. Most have battery backup as well.
Electrical systems also are regulated by an international and local building code. For example, electrical codes in some regions require wiring to be in flexible metal casing as an additional fire prevention measure. An electrical inspector must check the installation when the system is first being wired and again when the home is finished — right before closing — to ensure all codes are followed and the electrical system is safe for you and your family.
If you have specific needs, like a large audio/visual entertainment complex or a home office, ask your builder whether they offer advanced wiring systems, and what these systems include.
For example, a builder may offer an advanced wiring system that can handle specific electronic functions such as video and audio distribution. A gateway hub, or central distribution panel, acts as the distribution point for all incoming telephone, data, cable, and satellite TV lines. Information is carried over high-speed, high-quality cabling, terminating in wallplates throughout the home. An advanced wiring system may also include dedicated voice, fax, and computer modem lines to help you work at home.
Energy costs can be minimized through the use of a control system. With a control system, you can operate the heating, cooling, and ventilation equipment from work or while on the road. However, you can’t save money if your systems are not up to date, you may want to check out HTTPS://WWW.BURICHVAC.COM/HEATING/FURNACE-REPAIR/ to see how this can be done before you get on the road. In addition, you can program the operation of sprinklers or the pool. And lighting controls allow you to make your home look lived in when you’re away.
Remember, don’t assume the location of electrical outlets, communication wiring and lighting can’t be changed. Also, know what options are available and which ones will work best for you. To be sure you’re getting a quality electrical system that fits your lifestyle, follow these steps:
1. First, do your homework and think about how you’ll use each of the rooms. Where will computers, televisions, audio systems and other electronic equipment be set up? Does anyone in your family have special needs for light switches? Switches located at a low height will work well for those in wheelchairs. Rooms for senior citizens or children may call for a lighted switch.
Don’t forget about lighting. A good lighting design not only makes homes look better, but also makes you feel more comfortable. You’ve probably experienced this by adding your own desk and floor lamps to a room that only had a single overhead light.
2. Next, talk to your builder when your home is being designed. One good way to show your builder what you want is to walk through the home with them while the walls are open and tell them where you want electrical outlets and phone and cable lines. Walking through may give you a better perspective than reviewing the house plans on paper.
Walk through a model home with the builder and pay attention to the lighting in each room. For example, under-cabinet lighting in the kitchen is helpful for preparing food. Ask your builder if the lighting in that model home is standard. If not, does your builder offer upgrade packages for lighting and, if so, how much?
3. Also ask about lighting in garage and basement areas. Standard fixtures are incandescent. Fluorescent are more visually appealing, plus more efficient.
4. A final thing to consider is labeling the electrical panel. A clearly marked electrical panel is important for maintenance (e.g., when you have to fix a circuit breaker in little Billy’s room). Before the electrician labels the box, you should tell your builder what you want to call each of the bedrooms, so there’s no confusion about which rooms are which. This should be done after the home is finished but before the final inspection.
Learn how updating your electrical systems can boost your home’s value at HGTV’s FrontDoor.com.
For example, a builder may offer an advanced wiring system that can handle specific electronic functions such as video and audio distribution. A gateway hub, or central distribution panel, acts as the distribution point for all incoming telephone, data, cable and satellite TV lines. Information is carried over high-speed, high-quality cabling, terminating in wallplates throughout the home. An advanced wiring system may also include dedicated voice, fax and computer modem lines to help you work at home.
Energy costs can be minimized through the use of a control system. With a control system, you can operate the heating, cooling and ventilation equipment from work or while on the road. In addition, you can program the operation of sprinklers or the pool. And lighting controls allow you to make your home look lived in when you’re away. If your home heating system has not been updated, and you want to make sure it isn’t going to break down when you are not at home, you can turn to companies like onehourmagic.com and check out their ONE HOUR HEATING & AIR CONDITIONING service. Alternatively, you can look up your local listings for more help.
Remember, don’t assume the location of electrical outlets, communication wiring and lighting can’t be changed. Also, know what options are available and which ones will work best for you. To be sure you’re getting a quality electrical system that fits your lifestyle, follow these steps:
1. First, do your homework and think about how you’ll use each of the rooms. Where will computers, televisions, audio systems and other electronic equipment be set up? Does anyone in your family have special needs for light switches? Switches located at a low height will work well for those in wheelchairs. Rooms for senior citizens or children may call for a lighted switch.
Don’t forget about lighting. A good lighting design not only makes homes look better, but also makes you feel more comfortable. You’ve probably experienced this by adding your own desk and floor lamps to a room that only had a single overhead light.
2. Next, talk to your builder when your home is being designed. One good way to show your builder what you want is to walk through the home with them while the walls are open and tell them where you want electrical outlets and phone and cable lines. Walking through may give you a better perspective than reviewing the house plans on paper.
Walk through a model home with the builder and pay attention to the lighting in each room. For example, under-cabinet lighting in the kitchen is helpful for preparing food. Ask your builder if the lighting in that model home is standard. If not, does your builder offer upgrade packages for lighting and, if so, how much?
3. Also ask about lighting in garage and basement areas. Standard fixtures are incandescent. Fluorescent are more visually appealing, plus more efficient.
4. A final thing to consider is labeling the electrical panel. A clearly marked electrical panel is important for maintenance (e.g., when you have to fix a circuit breaker in little Billy’s room). Before the electrician labels the box, you should tell your builder what you want to call each of the bedrooms, so there’s no confusion about which rooms are which. This should be done after the home is finished but before the final inspection.
Learn how updating your electrical systems can boost your home’s value at HGTV’s FrontDoor.com.